Customize the toolbars
Removing items from active toolbars
If any item on the toolbar is not useful to you it can be
removed. I am going to use a floating copy of the Standard toolbar as an example:

In the above toolbar I plan to remove the Insert Hyperlink
button 
| Step
1 - From the View menu select Toolbar
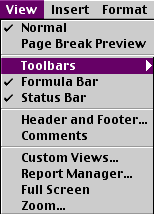 |
Step
2 - From the Toolbar submenu select
Customize
 |
Step 3
- Click on the button you want to remove |
| Step 4
- Click and drag the button until you see an x attached to the pointer |
| Done!
- Let go of the button and it is removed from the toolbar |
The same procedure can be used to move a toolbar button to
a new location on any toolbar
Restoring items to an active toolbar
To restore any buttons that you removed from a toolbar follow
this procedure:
- From the View menu select Toolbar
- From the Toolbar submenu select Customize
- Choose the Toolbars tab
- Click on the name of the toolbar
- Select the Reset button
- Click OK in the Reset Toolbar window
Adding buttons to a toolbar
A large number of toolbars can be added to the window from
the View/Toolbar window. However, you may wish to add only a button or two
to the open toolbars. There are some actions that I used regularly in Microsoft
Works which are not listed on the commonly used toolbars in Word, such as:
- Insert date
- 1.5 space and double space
If you browse in the Customize window you may find other
examples. In the example below I add the Date button from the Insert
menu. The following steps will allow you to add any buttons to any menu:
Step 1
- From the View menu select Toolbar See
Step 1 above
Step 2
- From the Toolbar submenu select Customize See
Step 2 above
Step 3 - Choose
the Commands tab then select the name of the menu (I used Insert).
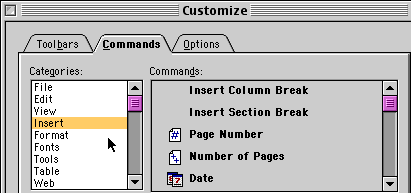
Step 4 - Scroll
in the right window to find the button.  Click and drag the button to the space on the toolbar where you want the button.
When you see the + on your cursor head, you may release the mouse button
Click and drag the button to the space on the toolbar where you want the button.
When you see the + on your cursor head, you may release the mouse button

Done!
- When you release the mouse, the button is placed where your cursor was.

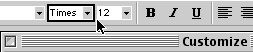
Changing the size of the window displaying
the selected font
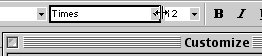
If I am using the font Arial there is more than enough room
to display the font name on the Formatting toolbar. If more room is needed,
the size of that window can be decreased. On the other hand, if I am using
the font Times New Roman MT Extra Bold the size of the window will be too
small to display the entire font name. Using the Customize menu, the window
can be re-sized using the following steps:
Step 1
- From the View menu select Toolbar See
Step 1 above
Step 2
- From the Toolbar submenu select Customize See
Step 2 above
Step 3
- When the Customize window appears click on the font name block, a
black box outlines the window when you put your cursor on the right edge
of the block
Step 4
- When your cursor changes to a double-headed arrow click and drag the
block larger or smaller.
Done! - When
you release the mouse, the box is resized.
Using the Symbol toolbar button
I often use symbol characters in documents I produce. On
my Macintosh I use Keycaps to find the symbols, and on my IBM I use the Character
Map. However, Word has a toolbar button which is easier to use than either
of those two applications.
Using the steps outlined above I added the symbol button
(Greek letter Omega) from the Insert menu. One click on this button brings
up a window with all available characters in a given font. Click once on a
character to see an enlarged view. Double-click a character to insert it into
the document

If you perform any task repetitively in Word, there is probably
a button to use for the task. Search the Customize/Commands window to find
what you are looking for.
Tasks to be performed before moving to the next window
Caution: Do
not close Netscape. Leave this window open so
you can move from Word to this page and back to Word. On a Windows 95 or higher
computer this can be accomplished with the task bar buttons. On a Macintosh
computer you can go to the Application Menu (some people call it the Finder)
at the top right corner of the screen to move from one application to another.
Open Microsoft Word. If the Standard toolbar is not displayed
go to the View menu and select it.
After you have completed all four tasks, move on to the next
subject, "Using Menu items in Word"
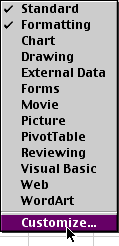
Other toolbars
Standard
| Formatting
| Drawing
| Customize

