| Sign Up For Our Newsletter |
| Sign Up For Our Newsletter |
Concept Mapping with Excel
Have you used Inspiration or Kidspiration to make concept maps? Both are great software packages, but you don't need to wait until that software is installed on your computer. If MS Office is on your computer, let's get started making a concept map in Excel.
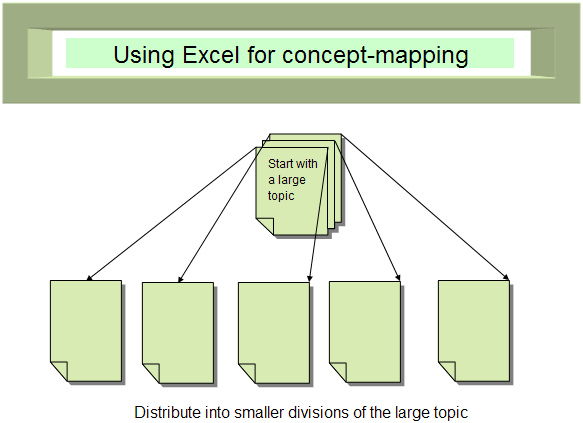
The image above was produced in Excel. The image does not look like it was made in Excel because the grid lines are missing. There are two ways to accomplish this:
- On the menu bar select the Tools menu, then slide down to select Options . Click on the View tab if it is not already selected, then deselect Gridlines . The sheet is now solid white. Once again, your worksheet still has cells, but the grid lines are not visible.
For the next step, the Drawing toolbar must be open. If the toolbar is open, it will be at the bottom of the worksheet. If yours is not there, go to the View menu, select Toolbars , then slide over and click one time on Drawing . An Excel concept map is made with AutoShapes and Connectors . You draw the AutoShapes first and then connect them with the Connectors .
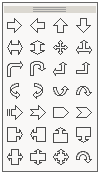
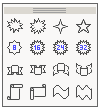
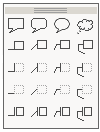
There are several categories of Autoshapes.
This opens a pane of selected clip art which can be used as concept map shapes
Drawing an AutoShape- Select AutoShapes on the Drawing toolbar, slide up to select one of the categories, and then slide over to click on a shape. This does not create a shape, you may draw the shape using your mouse pointer (which has turned into a cross hair). Click and drag to make the shape as large, or small, as you want it. If you need more of the same shape, copy and paste as many as you wish to have. To do that, make sure the shape is selected (it will have eight white circles around it). With the shape selected press and hold the Ctrl key and tap the C key while you are holding the Ctrl key down. With the Ctrl key still held down, tap the V key as several times to paste several copies of the shape.

Resizing an AutoShape - You have three different control circles surrounding the AutoShape you just drew. White circles are for resizing. Click on one of them and drag toward the center of the shape to make it smaller, or outward from the center of the shape to make it larger. The green circle allows you to rotate the shape. Click on the green circle and pull the image around in a circle until the shape is turned the way you want it to be. The yellow diamond allows you to change the nature of the line. Pulling the diamond away from the center of the shape to the left (called a rounded rectangle) would allow you to have a squared rectangle. Pulling the diamond toward the center of the rounded rectangle produces a more oval shape.
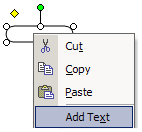
Adding Text to an AutoShape - Right-click the autoshape and select Add Text from the pop-up menu. Consider carefully what you plan to write on the AutoShape. If you try to say too much you must make further adjustments to the text size or to the AutoShape size. Remember, since you are creating this concept map on an Excel worksheet, you can click into any cell (invisible at the moment, but still there) and add more text near the AutoShape.
Adjusting an AutoShape to fit text - The rounded rectangle is not large enough to display the text typed into it. Put your mouse pointer on one of the white circles. When the cursor turns into a two-headed diagonal arrow, click and drag outward to increase the size of the shape.
Formatting an AutoShape - You may change the look of an AutoShape in several different ways; color of the background, color of the line around the shape, or you may also use fill effects which include gradient, texture, pattern, or pictures. All of this can be done from the Format AutoShape menu. However, you must click carefully. There are three shapes of cursors used to make changes to an AutoShape. When you move your mouse pointer into an AutoShape containing text you may see any one of the three following cursor shapes:
If your mouse pointer is over one of the white circles, the diagonal resizing cursor is displayed. If your mouse pointer is over the text, the i-beam text editing cursor is displayed. If you attempt to display the Format Autoshape pop-up window now, you will only be able to format the font.
 The move cursor is also the cursor which will allow you to display the correct Format Autoshape pop-up window. From this window you can change colors of the shape. Move your mouse pointer around carefully within the AutoShape until the four headed cursor is displayed. Right-click on that spot to bring up the Format AutoShape window. This will take some patience. If you get a Format AutoShape pop-up window that includes only Font , close the window and try again.
Connecting AutoShapes - At the top of the AutoShapes pop-up menu you will see Lines and Connectors . Don't use lines as connectors. The connectors have automatic sensing capability built in, but the lines are just lines. When they are locked in place, connectors will move with AutoShapes if you decide to rearrange them.
Steps for using connectors -
- From the Drawing toolbar select the AutoShapes pop-up window, then select a connector.
- Without clicking in the concept map, move the connector cursor (
) over the AutoShape. Several blue boxes will be displayed indicating where you can start a connection. Click on one of them. It is not necessary to click and drag.
- Move your cursor to the AutoShape that you want to connect to. More blue boxes will pop up showing places where the other end of the connector can be attached (targets). Click on one of them to select.
- If you see red circles at each end of the connector, then it is locked in place. If one of them is green, click on the green circle and drag it to a blue dot.
- To move a connector, click on one of the ends and drag it to another location.
The neat thing about the AutoShape connector targets is that they show up on all kinds of images; autoshapes, clip art, images copied from the Internet, even images created in Paint.
Formatting Connectors - Place your cursor over a connector. When your mouse pointer turns to a four headed arrow, right-click directly on the line of the connector. The format pop-up window will allow you to format the color, thickness and nature of the line (solid, dashed, or dotted).
Sample concept maps - Internet4Classrooms | Newton's Laws of Motion | Water Cycle | Safety - (Close the concept map window to return to this page)
Download an Excel workbook containing several concept maps - concept_maps_sample

Search Internet4Classrooms
 Custom Search
Internet4classrooms is a collaborative effort by Susan Brooks and Bill Byles.


advertisement
advertisement

- Site Map |
- About Us |
- Teacher Training |
- Make Internet4Classrooms.com your home page. |
- Copyright © 2000-2024 Internet4Classrooms, LLC All rights reserved.
Use of this Web site constitutes acceptance of our Terms of Service and Privacy Policy.
1744510355681298 US 1 desktop not tablet not iPad device-width