| Sign Up For Our Newsletter |
| Sign Up For Our Newsletter |

Using Excel as a Graphic Organizer:
Making a Coordinate Plane
You will use an Excel workbook to create a Cartesian coordinate system with each quadrant being 10 x 10.
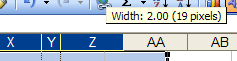
Open an Excel workbook. Click on the column heading A . The entire column will highlight. Scroll over to the right until you can see column heading Z . Hold down your shift key and click on the Z. You should now have 26 columns selected. Click on the line between any two column heading letters and drag to the left until the column width is approximately 2 (19 pixels). When you release the mouse button all 26 columns will be the same narrow width. This makes each cell approximately square. Scroll back to column A and click anywhere to remove the highlight color. We will use these grid lines as reference points for our coordinate system.
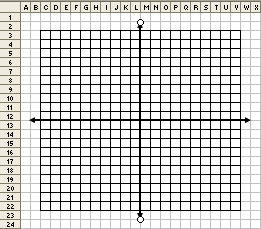
Next we will outline the area of our four quadrants. Click in cell C3 and drag down to cell V22. You could also watch the changing information in the Name Box until you see
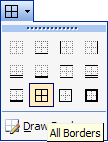
(Excel counts for you). With those 400 cells highlighted, click on the down pointing triangle to the right of the Borders button. From the drop down menu select the second button on the last row, the one that looks like a window with 4 panes.
Next you will draw two lines, one vertical and one horizontal. These lines will form the X and Y axes. You must have the Drawing toolbar open to draw these lines. If the toolbar is not open, go to the View menu, select Toolbars and slide over to Drawing and click one time.
Click on the word AutoShapes in the Drawing toolbar, move your cursor to Lines and click one time on the line with two arrow heads. Your cursor changed to a cross hair, the drawing cursor. Start drawing the X axis on the line between 12 and 13 on the row headers, and click and drag to draw a straight line that extends beyond the grid on both sides. To make a straight line, hold the Shift key down as you draw. While the line is still selected, move your cursor to the Line Style button on the Drawing toolbar and select the thick line labeled 3 pt . Repeat this process for the Y axis, starting on the line between column headings L and M .
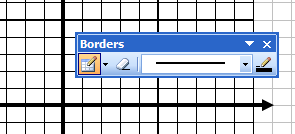
Numbers will not go where you want them to on the axes, so we will make the fifth lines up and over slightly darker. The simplest way to do this is to use the Borders toolbar button. Click on the down pointing triangle to the right of the Borders button again, but this time click on the line that says Draw Borders .
From the Borders pop-up, click on the down pointing arrow in the Line Style box and slide down to the thicker border just below the double border line. Use the pencil to draw a thick line from one side to the other right on line between rows 7 and 8 , and between 17 and 18 . Repeat this same procedure for the vertical lines between column headers G and H , and Q and R .
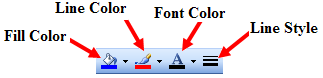
The final step to make this ready for classroom use is to draw several small circles to move onto the plane. Click on the word AutoShapes in the Drawing toolbar, move your cursor to Basic Shapes and slide over and down to the first shape on row 3, the oval. To draw a perfect circle, hold down the Shift key as you draw. Draw a small circle. After drawing the circle, use the line color button to fill it with color. There is a small down pointing triangle to the right of the button. Click on that triangle to select a color.
After filling the circle with color, copy the circle by holding down the Ctrl key and pressing the C key ( Ctrl + C ). After a circle is copied, paste several more of the circles by holding down the Ctrl key and pressing the V key ( Ctrl + V ) several times. Circles can be moved with the keyboard arrows or by clicking and dragging.

Let us know if you have any other ideas for using this feature of Excel. Bill Byles or Susan Brooks


Internet4classrooms is a collaborative effort by
Susan Brooks and Bill Byles.

advertisement
advertisement
Use of this Web site constitutes acceptance of our Terms of Service and Privacy Policy.
