| Sign Up For Our Newsletter |
| Sign Up For Our Newsletter |

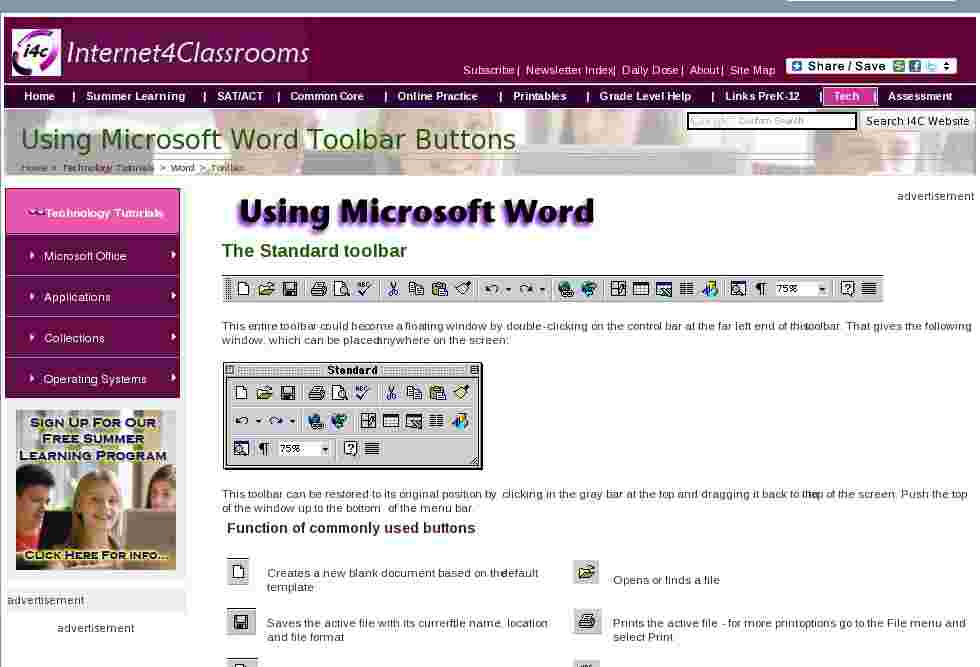
The Standard toolbar

This entire toolbar could become a floating window by double-clicking on the control bar at the far left end of this toolbar. That gives the following window, which can be placed anywhere on the screen:
This toolbar can be restored to its original position by clicking in the gray bar at the top and dragging it back to the top of the screen. Push the top of the window up to the bottom of the menu bar.
Function of commonly used buttons

Creates a new blank document based on the default template

Opens or finds a file

Saves the active file with its current file name, location and file format

Prints the active file - for more print options go to the File menu and select Print

Print preview - Shows how the document will look when you print it.

Spelling, grammar and writing style checker

Cut - Removes the selection from the document and places it on the clipboard

Copy - Copies the selected item(s) to the clipboard

Paste - Places the content of the clipboard at the insertion point

Format painter - Copies the format from a selected object or text and applies to other objects or text

Undo - Reverses the last command, use pull-down menu to undo several steps

Redo - Reverses the action of the Undo button, use the pull-down menu to redo several steps

Displays the Tables and Borders toolbar

Insert a table into the document, or make a table of selected text

Insert an Excel spreadsheet into the Word document

Columns - Changes the number of columns in a document

Displays or hides the Drawing toolbar

Zoom - Enlarge or reduce the display of the active document
The Formatting toolbar

This entire toolbar could become a floating window by double-clicking on the control bar at the far left end of this toolbar. That gives the following window, which can be placed anywhere on the screen:
This toolbar can be restored to its original position by clicking in the gray bar at the top and dragging it back to the top of the screen. Push the top of the window up to the bottom of the menu bar.
Function of commonly used buttons

Select the style to apply to paragraphs

Changes the font of the selected text

Changes the size of selected text and numbers

Makes selected text and numbers bold

Makes selected text and numbers italic

Underlines selected text and numbers

Aligns to the left with a ragged right margin

Centers the selected text

Aligns to the right with a ragged left margin

Aligns the selected text to both the left and right margins

Makes a numbered list or reverts back to normal

Add, or remove, bullets in a selected paragraph

Decreases the indent to the previous tab stop

Indents the selected paragraph to the next tab stop

Adds or removes a border around selected text or objects

Marks text so that it is highlighted and stands out

Formats the selected text with the color you click
The Drawing toolbar

This entire toolbar could become a floating window by double-clicking on the control bar at the far left end of this toolbar. That gives the following window, which can be placed anywhere on the screen:

This toolbar can be restored to its original position by clicking in the gray bar at the top and dragging it back to the top of the screen. Push the top of the window up to the bottom of the menu bar.
Function of commonly used buttons

A pull down menu with several
drawing options

Changes the pointer to a selection arrow

Rotates the selected object to any degree

A pull down menu with several libraries of shapes

Draws a line where you click and drag. Hold the Shift key down to make the line straight

Inserts a line with an arrowhead where you click and drag

Draws a rectangle where you click and drag. Hold down Shift to draw a square

Draws an oval where you click and drag. Hold down Shift to draw a circle

Draws a text box where you click and

Create text effects with Word Art

Add, modify, or remove fill color from a selected object

Add, modify, or remove line color
Formats the selected text with the color

Changes the thickness of lines

Selects dash style for dashed lines
Select arrow style; placement and shape of arrowhead

A pull down menu offers shadow choices

Add 3-d effects to rectangles or ovals
Customize the toolbars
Removing items from active toolbars
If any item on the toolbar is not useful to you it can be removed. I am going to use a floating copy of the Standard toolbar as an example:

In the above toolbar I plan to remove the Insert Hyperlink button
- From the View menu select Toolbar
- From the Toolbar submenu select Customize
- Click on the button you want to remove
- Click and drag the button until you see an x attached to the pointer
- Let go of the button and it is removed from the toolbar
� The same procedure can be used to move a toolbar button to a new location on any toolbarRestoring items to an active toolbar
To restore any buttons that you removed from a toolbar follow this procedure:
- From the View menu select Toolbar
- From the Toolbar submenu select Customize
- Choose the Toolbars tab
- Click on the name of the toolbar
- Select the Reset button
- Click OK in the Reset Toolbar window
Adding buttons to a toolbar
A large number of toolbars can be added to the window from the View/Toolbar window. However, you may wish to add only a button or two to the open toolbars. There are some actions that I used regularly in Microsoft Works which are not listed on the commonly used toolbars in Word, such as:
- Insert date
- 1.5 space and double space
If you browse in the Customize window you may find other examples. In the example below I add the Date button from the Insert menu. The following steps will allow you to add any buttons to any menu:
- From the View menu select Toolbar
- From the Toolbar submenu select Customize
- Choose the Commands tab
- Select the name of the menu (I used Insert )
- Scroll in the right window to find the button
- Click and drag the button to the space on the toolbar where you want the button
- Release the mouse and the button is placed.
Changing the size of the window displaying the selected font
If I am using the font Arial there is more than enough room to display the font name on the Formatting toolbar. If more room is needed, the size of that window can be decreased. On the other hand, if I am using the font Times New Roman MT Extra Bold the size of the window will be too small to display the entire font name. Using the Customize menu, the window can be re-sized using the following steps:
- From the View menu select Toolbar
- From the Toolbar submenu select Customize
- When the Customize window appears click on the font name window
- When the black box outlines the window put your cursor on the right edge of the window
- When your cursor changes to a double-headed arrow click and drag
Using the Symbol toolbar button
I often use symbol characters in documents I produce. On my Macintosh I use Keycaps to find the symbols, and on my IBM I use the Character Map. However, Word has a toolbar button which is easier to use than either of those two applications.
Using the steps outlined above I added the symbol button (Greek letter Omega) from the Insert menu. One click on this button brings up a window with all available characters in a given font. Click once on a character to see an enlarged view. Double-click a character to insert it into the document

If you perform any task repetitively in Word, there is probably a button to use for the task. Search the Customize/Commands window to find what you are looking for.

Internet4classrooms is a collaborative effort by
Susan Brooks and Bill Byles.

advertisement
advertisement
Use of this Web site constitutes acceptance of our Terms of Service and Privacy Policy.

