 |
Links for K-12
Teachers | Assessment Assistance | On-Line
Practice Modules | Daily Dose of the Web
Saving
![]()
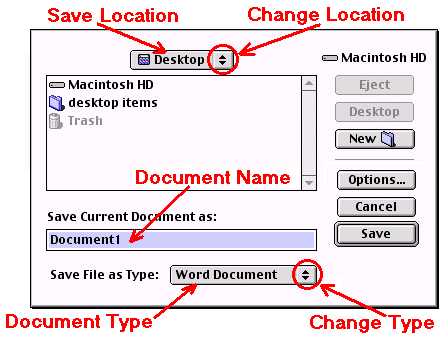
Save early and save often! If you ever stop working in one application to move to another application, save before leaving the first application. At this point you are probably saying, "Stop preaching and start teaching!" However, the unfortunate truth is that most people don't pay attention to saving until the first time they lose an hour's work when the computer freezes. So, one last time, save, save, save!The first time you save - After working a few minutes, stop to save. Go to the File menu and select Save As... Actually you can choose Save also, but the Save As window will still be the one that opens. The image below is clickable. If you want to know about one of the items, click on the label or the area of the window.

Save Location - The Save As window displayed above illustrates saving a file to the Desktop. Until you get accustomed to finding your way around your computer this would be a good place to save things. As you gain experience you may want to create your own folders on the hard drive as a saving location for images for presentations, lesson plan ideas or anything else you might need.
Change Location - If you don't plan to use the default saving location, move the tip of your mouse pointer to the downward pointing triangle and gently click one time with your index finger. Move your mouse pointer up or down in the list to select a new saving location. If any of the locations in this window have other folders into which you can save, you may select them with your mouse pointer in the Save As window.Document Name - If the File Name block contains a file name that is highlighted, type the name of your new document. Your new name will replace the highlighted name. If the name is not highlighted, click and drag to highlight the name before changing it. Click and drag means, place your mouse pointer to the right of the file name, depress the mouse button and move the mouse to the left until the name is highlighted.
- Naming suggestions - Use a name that reflects the content of the file. I recommend using lower case text, it is easier to type. Avoid using your name. If I have three files names byles1, byles2 and byles3, I may not remember a week from now what is in byles2.
Document Type - As a new user, you will usually not need to worry about this block
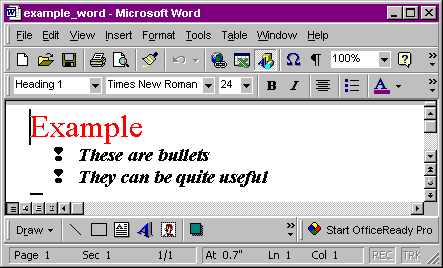
Change Type - In many applications, the file that you are saving can be in several different file formats. For example; instead of saving a Microsoft Word file you have been typing in document format you could save it in text format. You should be sure you know what format you want to use before changing anything here. In the examples below I save a document in document format, and then I save the same document as text only. Notice, all of the formatting is lost when I saved as text only.saved in document format

saved in text only format
Caution: Take care when changing file types.
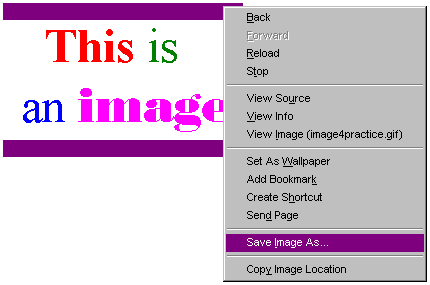
Saving an Image - (1) Find an image somewhere on the Internet. We will need one so you can practice saving an image. Have you found one yet? Good, now let's go to step two.

(2) Place the tip of your mouse pointer on any part of the image. Press the mouse button down and leave it depressed. A menu will pop up.

(3). Slide your mouse pointer down to Save Image As... and gently click one time with your index finger. The Save As window will pop up. You know what to do from there. If not, scroll up and review.
Task - (1) Open SimpleText. You did that in a lesson about the Built-In components of Macintosh. If you do not remember how to open Simple Text, go back to instructions on how to do it. (2) Type two lines of text, your choice as to the content. (3) Save the document. (4) Make the name of the document save practice. (5) Change the save location to Desktop if it is not already selected.
Mouse | Windows | Desktop | Built-In | Formatting a Disk | Saving | Keyboard
 Custom Search
Visitors since November 2000
Memphis, TN
Internet4Classrooms is a collaborative project developed by Susan Brooks and Bill Byles
Return to Internet4Classrooms home