Links for K-12 Teachers | Assessment Assistance | On-Line Practice Modules | Daily Dose of the Web Word Processing Becoming familiar with the menu items |
Step 1 - Launch Microsoft Works and select Word Processor
Step 2 - Become familiar with the file menu
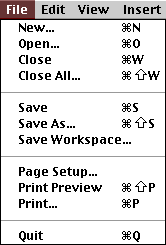 |
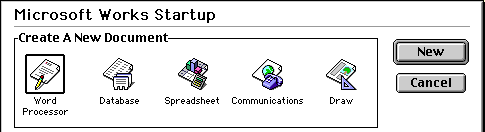
New... - Create a new Microsoft Works document. The window above opens. |
| Open... - Opens a document in Microsoft Works. The document could be on the hard drive or on a removable disk |
|
| Close - Close the current document. You will be asked if you want to save the changes. |
|
| Close All... - Close all Microsoft Works documents you have open. You will be asked it you want to save the documents which have been changed |
|
| Save - Saves the open document. When you save an untitled document the Save As... window opens. The next time you choose Save, MS Works will save the document in the same location. You are not asked if you want to overwrite the old document, that is done automatically. To change locations you must choose Save As... |
|
| Save As... - Saves the open document. A window opens giving you the choice of document name, saving location, and file format. |
|
| Save Workspace... - Save the documents that are currently open as a group. The entire group of documents can be opened all at once the next time you want to work with them. |
|
| Page Setup... - Change page orientation from portrait to landscape. If you select the document option you can change the margins on the page. |
|
| Print Preview - Judge how a document will look when printed by seeing the entire document at once |
|
| Print... - Send the document to the printer |
|
| Quit - Exit out of the application Microsoft Works |
Step 3 - Become familiar with the edit menu
| Undo - The first option under the Edit menu on many applications. If you made a change on a document that you wish you had not made, go here first. Do not do anything else before going to Undo, or else you will only be able to undo the thing you did after the mistake was made. |
 |
| Cut - Removes highlighted item from the document and stores it on the clipboard [text or images] |
|
| Copy - Copies a highlighted item from the document and stores it on the clipboard [text or images] |
|
| Paste - Places a copy of what is on the clipboard in the document at the location of the cursor |
|
| Paste Special... - In a word processor document, this allows you to paste information as a spreadsheet, rather than simply unformatted data. If you insert a Linked Spreadsheet Object, changes made on the spreadsheet will show up on the spreadsheet object which you inserted into the document. |
|
| Clear - Removes highlighted item from the document without placing it on the clipboard. This is useful if you keep a stored item on the clipboard. Cut would replace the current item with the one removed |
|
| Select All - Highlights all text in a document |
|
| Find... - Search the active document for a word, or part of a word. You may continue to search with the Find window open until all occurrences of the word have been found |
|
| Find Again - If the Find window has been closed you may continue to search by choosing this menu item. The easy way to do that would be to use the combination Command+Shift+F. |
|
| Replace... - Replace an item with a new item. Sample use - If you have downloaded a document produced by someone who thinks they are still in front of a typewriter, you may have a large number of double spaces following periods. Replace double space with single space in the entire document at one time. |
|
| Go To Page... - In a multi page document this allows you to jump directly to a specific page. |
|
| Links... - Edit a link to an object |
|
| Object - This option is not available until you highlight an object (spreadsheet, picture, word art, etc.). The menu option name will change to reflect the application which created the object, and will open that application so the object can be edited. |
Step 4 - Become familiar with the view menu
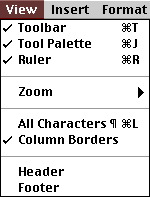 |
Toolbar - Add the toolbar to your document, or remove it if it is already present |
| Tool Palette - Add the tool palette to your desktop, or remove it if it is already present |
|
| Ruler - Add the ruler to the top of your document, or remove it if it is already present |
|
| Zoom - Increase or decrease the size of the document. The right arrow indicates choices available. They are the same choices available in the bottom left corner of the current document. [25% to 800%] |
|
| All Characters - Show, or hide, special characters like tab, space, or paragraph (carriage return). |
|
| Column Borders - I can see no change in the columns with this option selected or deselected. |
|
| Header - Move the cursor into the header |
|
| Footer - Move the cursor into the footer |
Step 5 - Become familiar with the insert menu
| Page Break - Insert a page break at some point above the bottom margin |
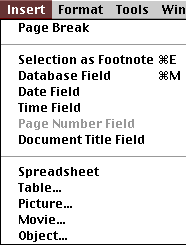 |
| Selection as Footnote - Make a footnote. The number of the footnote is placed at the location of the cursor. |
|
| Database Field - Insert a field from an open database. In this way a letter could be sent to every person in the database, or to selected individuals from the database |
|
| Date Field - Insert the current date. Caution, if you have a need to know the date a document was created, do not use this field. A saved document will insert the current date when it is opened at a later date. |
|
| Time Field - Inserts the time. The time shown on the document will be the time that MS Works was opened. However, the time on the printed document will be the time that it was printed |
|
| Page Number Field - With the cursor in the header or footer you can insert a page number field and place it on the left, right or center of the header or footer. |
|
| Document Title Field - Inserts the name under which the current document is saved. The title can be inserted in the header, footer, or body of the document |
|
| Spreadsheet - Insert a spreadsheet field into the document. Double click the field to modify the spreadsheet. |
|
| Table - Insert a table, you can control the size of the table |
|
| Picture - Insert a graphic from a file on the hard drive, on a disk or CD |
|
| Movie - Insert a movie from a file on the hard drive, on a disk or CD |
|
| Object - Insert a variety of objects. The actual number will depend on what applications are on your hard drive. One common application found here by most will be Word Art. |
Step 6 - Become familiar with the format menu
 |
Font and Style... - Make changes to text formatting. Change font, size and style. You can also create subscript and superscript from this menu item |
| Paragraph... - Specify alignment and spacing in a paragraph, convert text to bulleted points |
|
| Tabs & Indents... - Specify tabs and indents |
|
| Columns... - Format text into 1, 2, 3, or 4 columns |
|
| Alignment - Left, center, right, or justified alignment |
|
| Database Merge Options - Set options for how database fields are merged into a document |
|
| Copy Character Formats - Copy everything about the highlighted text except the alphabetic characters. Copy font, style, and size. |
|
| Paste Character Formats - Paste onto the highlighted text everything except the alphabetic characters. Paste font, style, and size. |
|
| Copy Paragraph Formats - Copy the formatting of a highlighted paragraph |
|
| Paste Paragraph Formats - Paste paragraph formatting onto a selected paragraph |
|
| Lock - To prevent unintentional changes, you can lock an object. A locked object cannot be selected, changed, or moved until you unlock it. |
|
| Text Wrap... - Specify how text wraps around an object. Tight text wrapping around a picture could be used to produce a newsletter. |
|
| Vertex Snap - With the Vertex Snap command, the object you draw snaps and attaches to the object closest to it or to the end point of the closest line. |
|
| Snap to Grid - Objects snap to position on the grid |
|
| Grid Settings... - Define grid settings |
Step 7 - Become familiar with the tools menu
| Spelling - Perform a spell check of a selected word or the entire document |
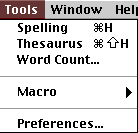 |
| Thesaurus - Get suggested synonyms for highlighted words |
|
| Word Count... - Get the number of characters, words, lines, paragraphs and pages in the document. |
|
| Macro - A macro is a recording of a series of mouse and keyboard actions. When you play back a macro, it repeats actions in the sequence you recorded them. Use macros to automate repetitive tasks. |
|
| Preferences... - Set the defaults for each of the components of MS Works |
Step 8 - Become familiar with the window menu
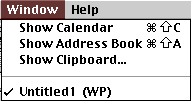 |
Show Calendar - Open MS Works calendar |
| Show Address Book - Opens the address book. This is a database which has been designed to look like two rolodex cards. As with any Works database you may view this in list view or data view. |
|
| Show Clipboard - View the current contents of the clipboard |
|
| Document Name - Here you find a list of all MS Works documents which are currently open. Use this menu item to move from one document to another. In parentheses behind the document name you will find the document type; word processor (WP), database (DB), or spreadsheet (SS). |
Step 9 - Become familiar with the help menu
| About Balloon Help... - Brief explanation of how to use Balloon Help |
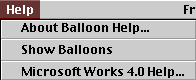 |
| Show (or Hide) Balloons - Turn balloons on, or off. |
|
| Microsoft Works 4.0 Help... - MS Works has an extensive Help handbook. It is organized by topics, but an index search is also possible. Enter a topic and see a suggested answer |
Step 10 - Choose what you want to do next.

Custom Search
|
Visitors since November 2000 |